![]()
Search Wild Foods Home Garden & Nature's Restaurant Websites:
River Bank Grape
(NOTE: If you are not interested in growing the River Bank Grape, but just finding the plant and using it, try going to the Nature's Restaurant Online site. Grape Tendrils, Leaves & Grapes.)
River Bank Grape (Vitis riparia). Often spelled Riverbank Grape.
If you have a full sun spot and something for the vines to grow on like a trellis, "Normal" Grape Vines are both functional and food bearing. I'm not going to cover the different types you can buy from nurseries, go to nurseries and discuss with them what is best for your area and you. What I will cover is the River Bank Grape, and the unusual way I use them as a greens crop - not for the fruit.
Most people would not understand why I would bother growing the River Bank Grape. It is seen as a weed, and useless for its grapes by many. If you were just growing for the fruit, I understand their point, but the River Bank Grape has some features that make it a great greens crop. One, it is very cold tolerant, and it is one vine you don't have to worry about getting hurt by the cold. In fact, one of its names is the Frost Grape. Another very good reason I love this plant is that once established, it is the most drought tolerant greens crop plant I know of. Few realize the leaves and tendrils are edible, and the tendrils in particular are delicious raw or in cooked meals. Both the leaves and tendrils must be used when they are young and tender, and the tendrils must be used before they touch anything and start wrapping around what they touch - as soon as the do, they start to turn woody.
Seeds: Not hard to do, but just so you know, the plant is slower to mature done this way. Wash the flesh off the grape seed, and either plant in the garden in the fall right after you gather them. Plant about 2.5 cm (1 inch) deep, firm the soil over them and cover with about 5 cm (2 inches) of mulch and leave. In the spring, some will come up. Plant at least four seeds for every vine you want, and thin if you get extras.
If you want to plant in the spring, wash the seeds clean, put in water to see which ones float and which ones sink. Throw out the floaters. Take the sinkers, and mix with a little moist, but not wet peat moss, put in a zipper type freezer baggie, put in the fridge (not freezer) and take out and plant in the spring. You can start them right in the ground, or in small pots with standard potting soil, and transplant into the ground when they are about 10-15 cm (4-6 inches) tall. Keep moist until established.
Transplanting: Don't bother trying to transplant unless you find a very small one - they have deep tap roots making transplanting very hard.
Cuttings: Cloning is the best way to go. Take four cuttings for every plant you want - some won't take. The steps to cloning a grape vine are:
- In late Winter, take cuttings from the vine you want to clone. Look for vines that were new last year, about as thick as a pencil or a bit more, about 30-40 cm (12 to 16 inches) long, and make sure that it has at least five or more buds on each cutting. The cut off on the lower part should be just below a bud, and the cut on the top should be a few centimeters above the top bud - you should know by doing this which is the up side - it matters.
- Dip each cutting for a few seconds in a 20:1 water:bleach solution (5 % bleach) to kill any fungal diseases. Then push each cutting into pots of sterilized, damp potting soil, making sure you get at least three of the buds in the soil - make sure you plant the cuttings with the lower part as the bottom in the soil, in other words, don't plant them upside down. You can wipe on some rooting hormone to each bud node that will be in the soil to speed the process before pushing the cutting into the soil. You can get rooting hormone at garden stores. Get the strength for woody plants, if not sure, ask at the garden center. If you get the powder kind, dampen the cutting before applying the powder. If you have six buds on a cutting, get four under soil, if you have eight buds on a cutting, get at least five under the soil - you get the idea.
- Next, cover with a plastic bag making sure the bag doesn't touch the cutting. Use two wires to make hoops pushed in the soil, chicken wire as a dome, or whatever. Use an elastic over the bag and pot to make sure the inside is a sealed humidity chamber, with one tiny (pencil lead sized) hole in the bag to breath. Put in light, but not direct sun, in a warm (room temperature) area. A north facing window or under florescent lights for instance.
- After five or six weeks, the cutting should have sprouted, when it does, put in four or five pencil sized holes in the bag. Make sure the soil stays damp. Once the vine really takes off and starts to have new growth touching the bag and roots coming out the holes in the pot bottom, take the bag off and transplant into the garden, but make sure it stays damp and is not in full sun. I find just putting a lawn chair over it does a good job.
- On rainy and cloudy days, take the shading off, and slowly, near the end of the first year, get it used to short periods of full sun.
Soil & Site: You need to find a full sun spot where you can either mow around it, or work around it to keep it in check. Yes, this plant can grow like few others, and if not contained it will take over everywhere - and fast. Here is the way I like to grow it: Find a spot in a yard - a grass area is fine, and plant the vine. Each vine needs the space of a circle about 2 meters (6 feet) in diameter. The soil needs to be neutral to alkaline, so best to test the soil where you want it, but in most cases, dig out the soil in the spot you want it, mix in some composted manure and lime, and put that mix back into the hole.
Maintenance: Mow around it, or keep in within that circle by trimming. In the first couple of years you can get a few leaves and tendrils in the spring to very early summer. Each and every fall cut it right back to about 30 cm (1 foot) from the base of the vine. The trick here is to leave last year's cut, and cut off each vine leaving a little stub. In time, there will many stubs that form a globe shape. In a few years, each year you will have a bush of vines you can harvest many, many leaves and tendrils from. The vine will never need watering as the tap root can go far down to find its own water. A reliable, spring greens crop that only needs to be mowed around when you cut the lawn, and a once per year fall cut back.
Harvesting: The best time of year for gathering is May and June, but as long as they are tender and green and within 30 cm (12 inches) or so of the growing tip of the vine, they are fine in July, but are a little more chewy. I want to repeat what I said at the beginning of this section: Once the tendrils have touched something and begun to wrap around that thing, they immediately start to turn woody, and are no good for food. They must be young tendrils that are floating in the air - see the picture below for what you are looking for when harvesting.
Using: The way to use it is very simple once you have it established in your yard. The raw taste of the tendrils is lemony or citrus like. When I first tasted a tendril raw, the first thing I thought of was a candy called sweet tarts. When cooked, they impart a flavor very similar to a squeeze of lemon, but tastier in some way I can't describe. They go really well in soups that are lentil based.
In a salad just use as many as you would like chopped. By the time I’ve picked a hand full, I’m tired of picking and that’s how many I use. I have to confess however, that when I’m picking them for using in salad or cooking, I tend to eat half of them on the spot as I’m picking. They zing up the flavor of the salad and have a nice tender crunch to them without any stringy texture as long as you picked the right ones early enough in the season.
Young leaves can be chopped up and added to almost any cooked meal - very good in soups, but the way I like to use them is in making Warak Arish, a traditional middle eastern food. I've included the basic way to make them, and some wild grain fills you can try under the pictures and the end of this River Bank Grape vine entry. In the spring and early summer you can pick nice young leaves for pickling to use all year for making Warak Arish.
Now, you can grow River Bank grape vines for the fruit, by growing them the same way as you would any other grape grown for the fruit. There is much information in books on the web how to do this, and I am not an expert on this subject, so if you want to do that, do some research. What I will say is the two or three wires between posts system is the method I like, and leave it at that. River Bank grapes are smaller than cultivated grapes, often pea sized, and dark purple or blue looking with a whitish dusty surface called a “bloom”. To some people, they taste good fresh, to others not so good (too strong and tart). The seed takes up most of the space within the grape - the flesh is sparse. I enjoy the tart, fresh, powerful burst of Grape flavor from the fruit. They are so "Grapey" in flavor, you'd think each one was a concentrate of ten normal grapes. Grape jelly or jam made from these is very strong flavored. A thin layer of this on toast is fantastic. Each fall, I go to the wild vines that I know and get my fill that way, and only grow the ones at home for the spring greens.
Identification: The different Wild Grapes of Eastern North America are hard to tell apart for all but Vitis scholars. Here are some characteristics that should help. On the underside of the leaves of the River Bank Grape, the veins are hairy, but no, or few hairs on the rest of the underside. With the River Bank Grape, the underside of the leaf will not have an obvious white or silver color - that would be the Silverleaf Grape. On the River Bank Grape, on the growing ends of the vine in the spring, often the growing tip will not be visible as there are two small leaves acting like a pair of hands clasping the growing tip - looks like the leaves are protecting the growing tip. On the others, you can see the growing tip. Also, with the River Bank Grape, on the leaves, the side lobe tips tend to point the same direction as the main lobe - that is pointing up, where with the Silverleaf and the Summer Grape, the side lobe tips tend to point out more at an angle. Another difference, but not apparent until you have the leaves side by side or pictures side by side, the sawtooth pattern is deeper and sharper on the margins of the River Bank Grape that either the Silverleaf, the Summer Grape or the Fox Grape. The sawtooth on the River Bank Grape is thinner and pointy, while with the Muscadine, the sawtooth is triangular - as long as wide at the base.
Description:
- USDA Plant Hardiness Zone: 2-9 (More information on hardiness zones).
- Soil pH: 6.1-8.5
- Plant Size: Vine that can find its way to the top of the highest trees, go long distances along the forest floor, and get a shaggy trunk that I've personally seen about 15 cm (6 inches) in diameter.
- Duration: Long lived Perennial
- Leaf Shape: Maple leaf like
- Leaf Phyllotaxis (Arrangement) on branch: Alternate with Opposite tendrils
- Leaf Size: 5–25 cm (2 to 10 inches) long and 5 to 20 cm (2 to 8 inches) wide
- Leaf Margin: Sawtooth, sometimes with shallow lobes, sometimes with very deep lobes.
- Flowers: The panicle shaped Inflorescence (in simple terms - a bunch of flowers that grow like a bunch of grapes) is around 4–15 cm (1 1/2 to 6 inches) long with green tinted white to white flowers in May to June.
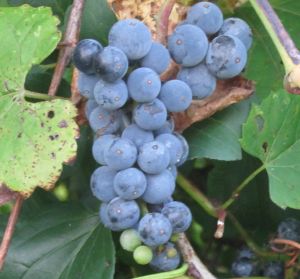
- Fruit: The grapes appear in tight bunches. Each grape is 6–15 mm (1/4 to 3/5 inch) blue-black to purple-black with a whitish bloom (like a powdery coating) that rubs off easily. Sour/sweet strong grape taste.
- Bark: Current years' growth - green. Last years' growth - reddish brown to light brown smooth skin. Old bark is greyish with a reddish hue to an auburn red. Old trunks often have linear, shaggy bark coming off in long strips. Occasionally not very shaggy, but scaly with long lines that can appear to wind around the trunk. There is a soft, cloth like quality to the feel of the shaggy bark, not a hard woody feel.
- Habitat: In open areas of woods where trees have fallen, along creeks and river banks, on fences in fields, over bushes and trees in fields, or just matting the ground in fields. Likes rich, moist soil, but seems tolerant of many conditions. Full sun or partial shade.
Web Resources:
- Recipe search on the web here (Google search) and here (Bing search).
- Pictures on the web here (Google images) and here (Bing images).
- Interactive USDA distribution map and plant profile here.
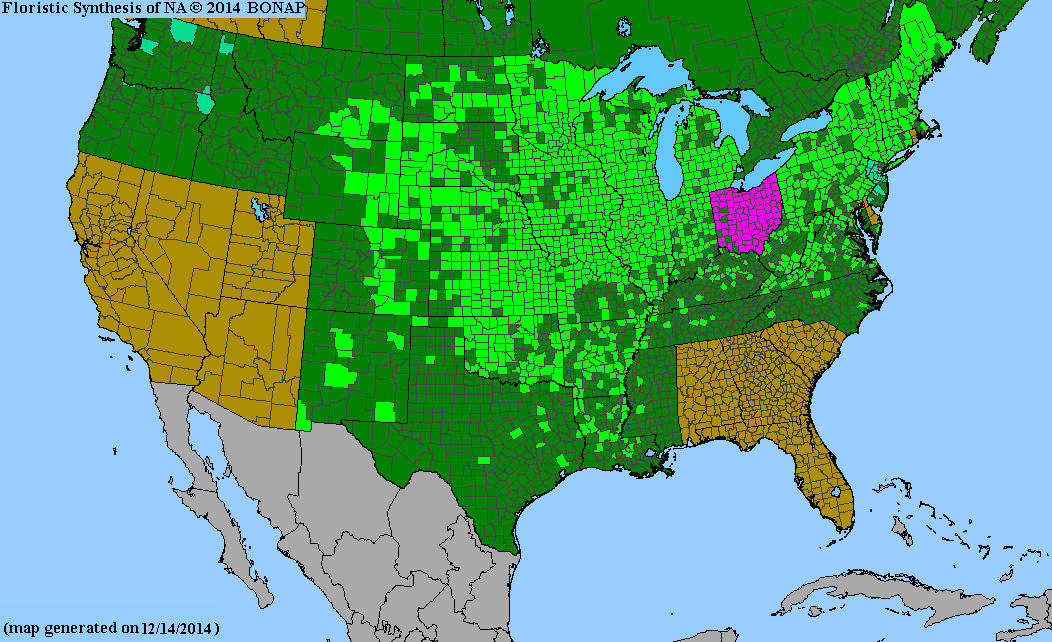
- The Biota of North America Program (BONAP) distribution map here. BONAP map color key here.
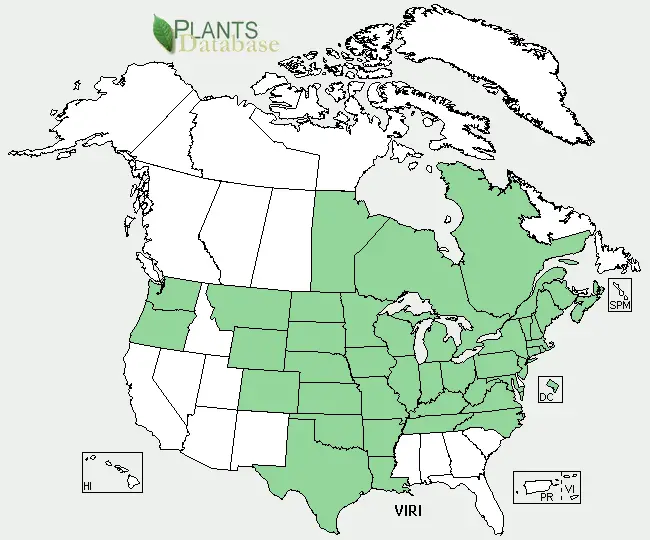
River Bank Grape (Vitis riparia) range. Distribution map courtesy of U. S. Department of Agriculture (USDA Natural Resources Service) and used in accordance with their policies.
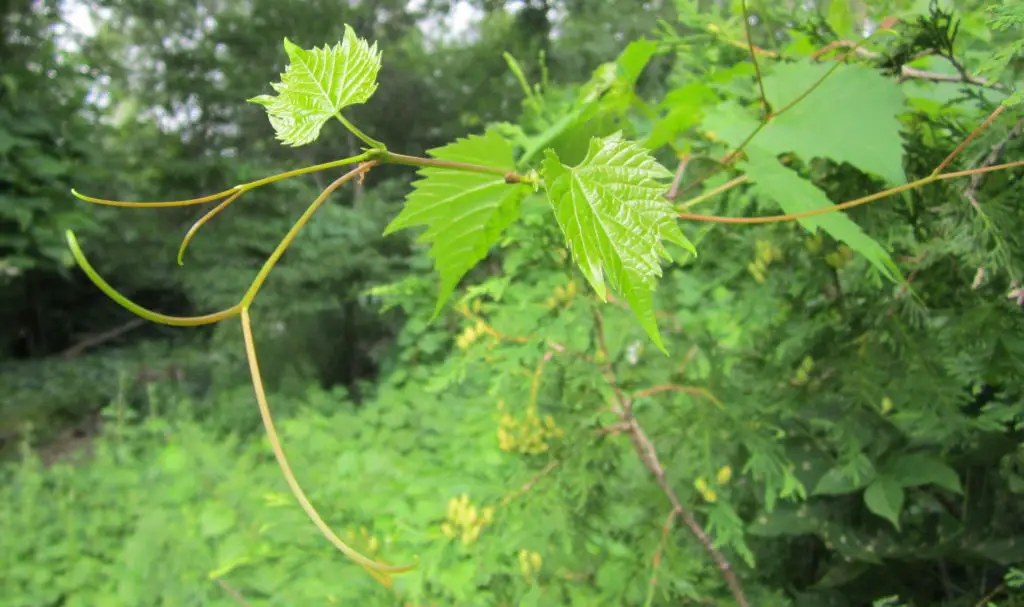
Grape Tendrils and young light green leaves. All four tendrils in this picture were perfect for harvesting (and they were very good). Notice they are not touching anything. If they begin to wrap around something, they quickly turn woody and are no good for eating.
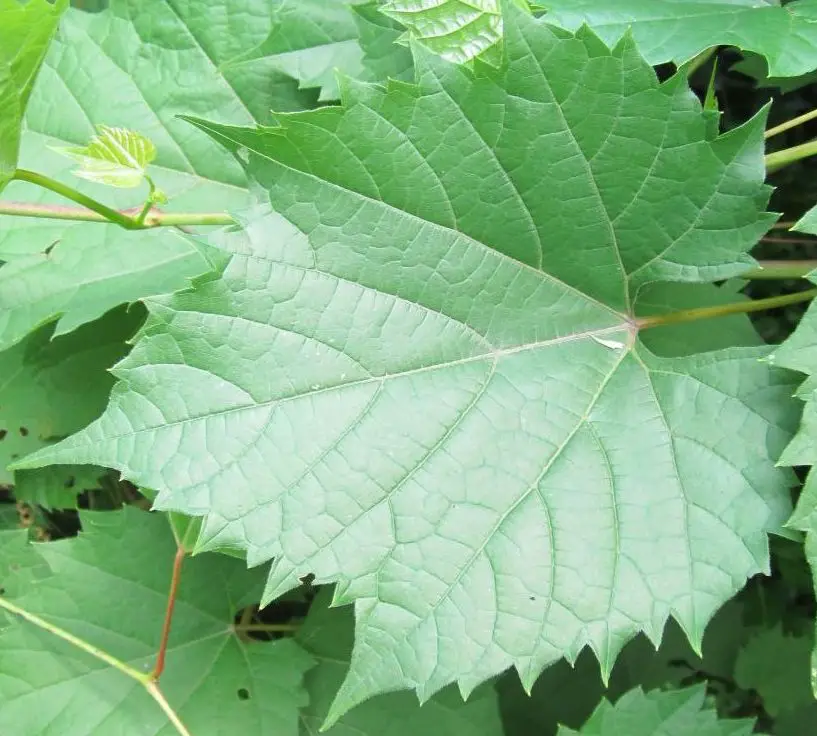
Grape leaves have many shapes. This one is good for Warak Arish.
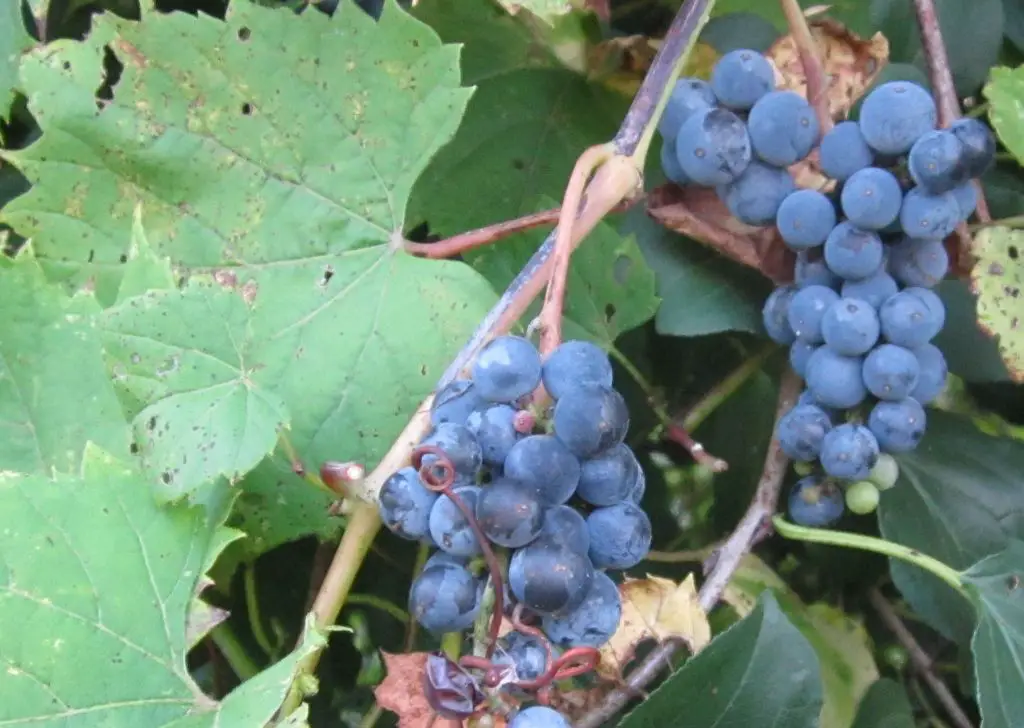
Typical River Bank Grapes. These were found on the edge of a creek climbing over a Buckthorn and hanging down. The three dark green leaves in the lower right of the picture are Buckthorn leaves. If you are going to start your River Bank Grapes from seed, this is what you are looking for. Take these home, eat the flesh off the grapes and plant a seed about an inch deep, tamp the soil down, and mulch. Plant in the fall as soon as you find the grapes.
Warak Arish
A very old food from the Middle East that uses Grape leaves to wrap around a fill. Always cut out where the leaf stem meets the leaf.
Take a grape leaf (shiny side down) and stem end of leaf facing you, and put in 1 Tsp to 1 Tbsp – depending on size of leaf, of the fill (see below for suggestions, you can come up with many), roll it partway, tuck the edges in, finish rolling and put in a pot or casserole dish, depending on whether you are going to bake or cook on stove top. Keep doing this until you have one layer packed with them, then do the next layer in an alternate direction. When the pot or casserole is filled close to top, cover with water to top layer, put in the juice from a couple of lemons, bake at 325 -350 until water is gone (about 1 to 1.5 hours), or if cooking on the stove top, bring to boil, lower heat, cover and simmer lightly for about an hour.
Fills for Warak Arish:
Traditional Style Vegetarian (Vegan) Fill:
- Chickpeas – about 2 cups cooked
- 1 to 3 bunches of parsley well washed and chopped up after stems removed
- 1 cup of cooked Bristly Foxtail grain, millet, bulgur wheat or cooked rice – try all or mix
- 1 medium onion chopped fine (or 3 or 4 green onions)
- 1/4 cup finely chopped fresh mint (or 1 to Tbsp dried mint powder)
- 1 large or 2 med finely chopped tomatoes
- 1/2 tsp. pepper
- juice from 1 or 2 lemons
- 1/4 cup grapeseed oil
- 1 to 2 tsp. Salt
- options include 1/2 tsp allspice, basil, oregano, (even curry)
Mash up the chickpeas, add rest of ingredients and mix well. If seems too dry, add a bit of water, but the tomatoes should do the trick.
Another Fill
- 1/4 cup Amaranth Grain (Black from collected Grain or Yellow store bought)– unground, and uncooked (it will cook when baking or stove top cooking the finished rolls)
- 1 cup cooked Quinoa or Lamb's Quarters grain
- 1 cup cooked Buckwheat
- 1 cup brown rice (with about 1/3 wild rice)
- 1 cup cooked millet or Bristly Foxtail
- finely chopped onion
- finely chopped tomato
- 1/4 cup finely chopped fresh mint or 1 tsp dried mint
- 1/2 tsp. pepper
- juice from 1 or 2 lemons
- 1/4 cup grapeseed oil
- 1 to 2 tsp. Salt
- options include 1/2 tsp allspice, basil, oregano, (even curry)
You can use mashed chickpeas in this one as well, try either way and use what you prefer. I like to make each batch slightly different each time just for variety.
Search Wild Foods Home Garden & Nature's Restaurant Websites:
Share:


Why does this site have ads?
Originally the content in this site was a book that was sold through Amazon worldwide. However, I wanted the information to available to everyone free of charge, so I made this website. The ads on the site help cover the cost of maintaining the site and keeping it available.
Google + profile
![]()
Wild Foods Home Garden Logo Copyright © 2017 David G. Mills.
Text Copyright © 2014, 2015, 2016, 2017, 2018 David G. Mills.
All Photographs Copyright © 2014, 2015, 2016, 2017, 2018 David G. Mills except where noted.*
All Drawings Copyright © 2014, 2015, 2016, 2017, 2018 David G. Mills except where noted.
All Rights Reserved.
This may not be reproduced in any form, in whole or in part, without written permission from the author.