![]()
Search Wild Foods Home Garden & Nature's Restaurant Websites:
Amaranth (Green)
If you are more interested in finding Green Amaranth in the wild and harvesting the greens or grain than growing the plant, try my Nature's Restaurant Online website for Amaranth greens and Amaranth grain.
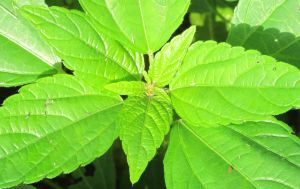
The Amaranth (Amaranthus) is a huge family of plants. The one I use for greens and grain is the Green Amaranth (Amaranthus retroflexus), a very common weed that is a major problem for soy bean farmers. It is also called the Redroot Amaranth, as it has a red root. This Green Amaranth likes hot weather, and they are not found in early spring. They are a summer plant, and tend to come up after a hot spell. For the same reason this is a hated weed of farmers, it makes an excellent plant to grow in the home garden - it is super easy to grow.
Soil & Site: Don't grow this plant on soils that are polluted, and don't use nitrogen fertilizers or composted manure as fertilizer. Good organic soil is fine, but there is no need to fertilize, and you don't want it growing in a nitrogen rich environment, as it takes up the nitrogen and converts it into nitrates. This makes this plant ideal for hot areas on nutrient poor soils, and keeps the cost down. This plant can happily grow in soil pH that ranges from 4.2 to 9.1. That's the largest pH range for a plant to live in I know of. One other great thing about this plant (unless you are trying to eradicate it), it uses very little water - it is drought resistant. This is a five star plant in hot, dry areas with low nutrient soils.
Is the growing of this plant compatible with Natural farming, Ecoagriculture or Eco friendly agriculture, Ecological farming, Sustainable agriculture, Agroforestry or Agro-sylviculture and Permaculture: This is an ideal plant to grow in a tilled or Natural farming no-till garden. It is hardy, and handily wins out over most plants in the right conditions. If you are using a no-till method, this plant will self-seed. As is the case with most no-till gardening plants, stay on the paths, and don't compact the soils where the plants are growing by walking on the soil where they grow.
Planting: Gather the black, shiny seeds from plants in the fall and plant in late fall by spreading the seed on the area you want them, or save inside, and spread in the spring. They won't germinate until it gets hot and stays hot. In fact, the ideal germination temperature is 30-40 Celsius (86-104 Fahrenheit). Don't bother trying to transplant one of these unless it is very small. It is hard to do, and the plant is very likely to die anyway. If you try, you will know quickly how it went, as they wilt quite fast if they are not going to take.
Because this plant won't germinate until it is very hot, it works well by planting in the same spot as leaf lettuce or radishes. Put both seeds on the soil at the same time in the same spot, rake them in and tamp down in early spring as soon as the ground can be worked. You get three harvests from one spot. First the leaf lettuce or radishes will come up - they both like cool weather, and are fairly fast. Harvest them until the weather turns hot. Once it does, the lettuce will bolt or the radishes will be turning to seed and have gone woody - their time is done. At the same time though, the Green Amaranth will be sprouting. It loves the blazing hot summer sun and can handle a fair bit of drought, so this one is water efficient when you need that the most. You can start using the greens very soon after they sprout, then, when fall comes around, you will have the Amaranth seedheads that will be filled with the high protein tiny, shiny black seeds.
Maintenance: Because this is an annual, there is nothing to do for the plant. If you want it for the greens only, you can pull it up after you are finished using it for greens. If you are going to use the grain, pull it up after the grain harvest.
Harvesting: Harvesting the leaves is as simple as picking the upper young ones early on in the plants life. As they get older, they get tougher.
When harvesting the grain, you can get a fair bit for the effort if you have big plants that are fully ripe, however the chaff from the seed heads can get into your skin and be very itchy and uncomfortable. You must wear gloves, and not just thin cotton gloves. Leather works, but the best I have found are thick rubber coated gloves with the cotton lining - the kind used for working with chemicals, they look like industrial versions of dish washing gloves.
- Only gather when the weather has been dry for at least a few days - the seed heads must be completely dry.
- To see if it is ready for harvest, hold a sheet of white paper under the bent over seed head and shake it a little. If you see tiny, shiny black seeds falling on the paper it is time.
- Use an old pillow case to gather with. Put the top of the pillow case gently over the seedhead, using your hand clamp the pillow case around the stalk just below the seedhead, bend it over and snip it off with a sharp pair of scissors, then let the seedhead drop into the pillow case. The idea is to capture all the seeds - with any movement seeds will fall out. If you carefully bend them over a bucket and cut off, that works too.
- When you have gathered a bunch of them (don't fill the pillow case more than a third full), hang the pillowcase up on a clothesline or something similar (with gloves on) and aggressively rub the seedheads around inside the pillow case. Another way is dump all the seedheads into a large container (clean garbage can, or very large storage container) and rub the seed heads with the gloves on to break it all up.
- After you have done this for long enough that it feels like the seedheads have been broken down a lot, carefully take the pillowcase holding it so that there is a small opening, pour out the grain and chaff into a bucket trying to hold back the larger bits and stems. Repeat the rubbing process with what is left to get more.
- On a breezy day, or in front of a fan, very slowly pour the grain from one bucket to another so that the black seeds land in the bucket and the chaff blows past it. It is an art, so take your time and repeat the process over and over until fully cleaned. You really have to get all the chaff out, as it gets caught in the back of your throat if you have some left in. Be patient and take your time.
Using: Use the top, young leaves only as a cooked green. The small, young leaves are good as greens in soups and stir fry's. You need to boil them quickly first, water poured away and then use.
The black seeds are very healthy, nutty tasting and very high in protein. The yellow seed version of it is grown in Central America as a food staple, and has been for hundreds, if not thousands of years. It was popped like popcorn and mixed with honey and eaten in small cakes when cool. The yellow version of the seed is available at health food stores.
Amaranth grain can be mixed with other grains and boiled quickly into a hot breakfast cereal, or ground into flour and mixed with buckwheat for pancakes. You can use the whole grain mixed with flour and made into bread. It adds protein and a nice nutty flavor. If you want to grind it into flour, a clean small coffee grinder works best and is easy to do. Some suggest lightly roasting the grain before grinding into flour or using in breads. I've tried both ways, and each is good, but slightly different.
Popping Amaranth seed truly is an art. Too little heat and they will not pop, too much and they will burn. Use no oil, heat a pan or pot until it is fairly hot, put in a couple of tablespoons of Amaranth seeds and gently move the pot around to keep the seeds moving. When you get the technique down, you will be able to do this about 5 times in 15 minutes, and have enough for a bowl of popped amaranth cereal, or mixing with honey when still hot after popping, forming into cakes and letting cool. Very tasty. Like I say, it is an art, and will take a while to get the hang of it.
Description:
- USDA Plant Hardiness Zone: 3-10 (More information on hardiness zones).
- Soil pH: 4.2-9.1
- Plant Size: Up to 3 meters (10 feet), usually 1 to 2 meters (3 to 6 feet)
- Duration: Annual
- Leaf Shape: Simple - Lanceolate (upper leaves), Ovate to Rhomboid (lower leaves)
- Leaf Phyllotaxis (Arrangement) on branch: Alternate
- Leaf Size: Up to 15 cm (6 inches), usually smaller
- Leaf Margin: Entire (no sawtooth or lobes), often wavy
- Flowers: Spike of green, turning reddish or yellowish, then tan-brown in fall. Fuzzy looking, scratchy feeling
- Fruit: very small shiny black seed, almost spherical to egg shaped
- Habitat: disturbed, open conditions such as ploughed fields, dug gardens
Web Resources:
- Recipe search on the web here (Google search) and here (Bing search).
- Pictures on the web here (Google images) and here (Bing images).
- Interactive USDA distribution map and plant profile here.
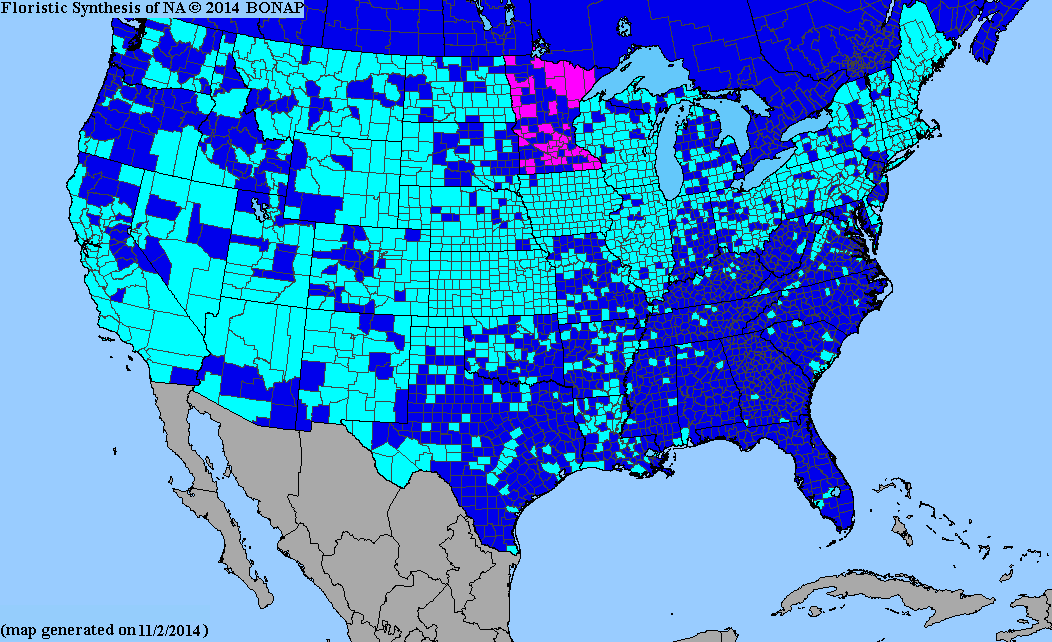
- The Biota of North America Program (BONAP) distribution map here. BONAP map color key here.
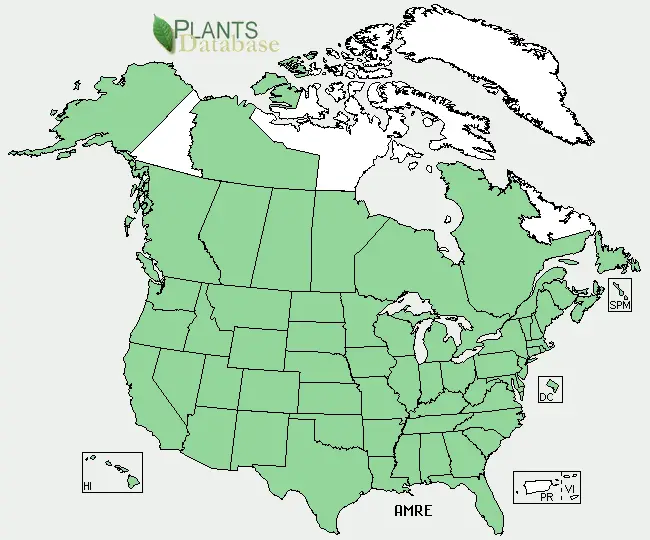
Green Amaranth (Amaranthus retroflexus) range. Distribution map courtesy of U. S. Department of Agriculture (USDA Natural Resources Service) and used in accordance with their policies.
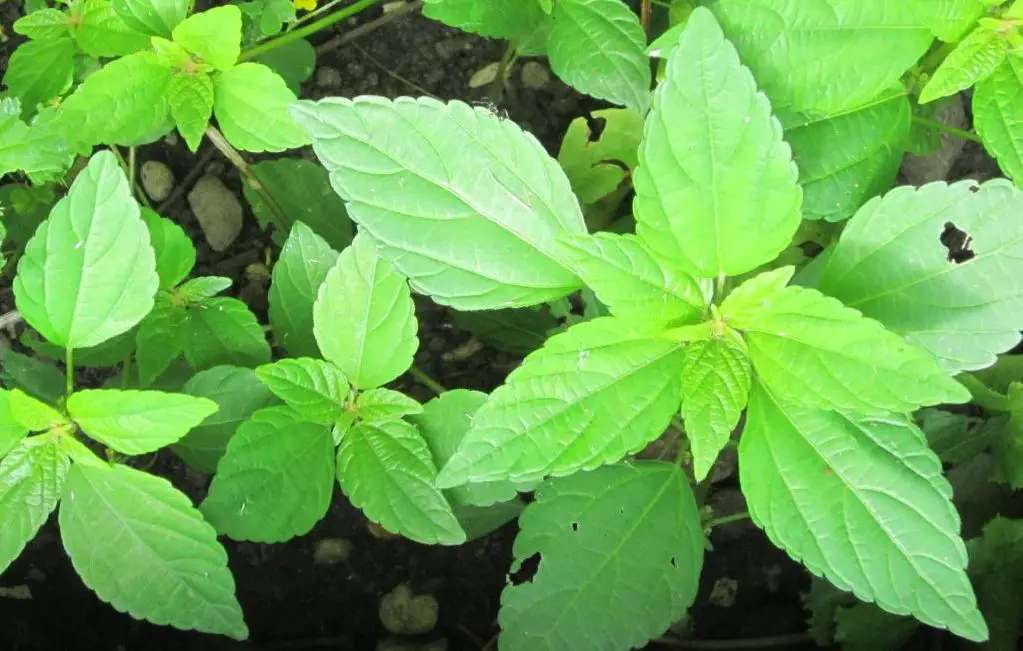
A group of young Green Amaranth (Amaranthus retroflexus) in mid July. The top yellow-green leaves are choice for eating. Thin out leaving the healthiest looking plants to about one plant per square foot. Use the ones you thin for cooking.
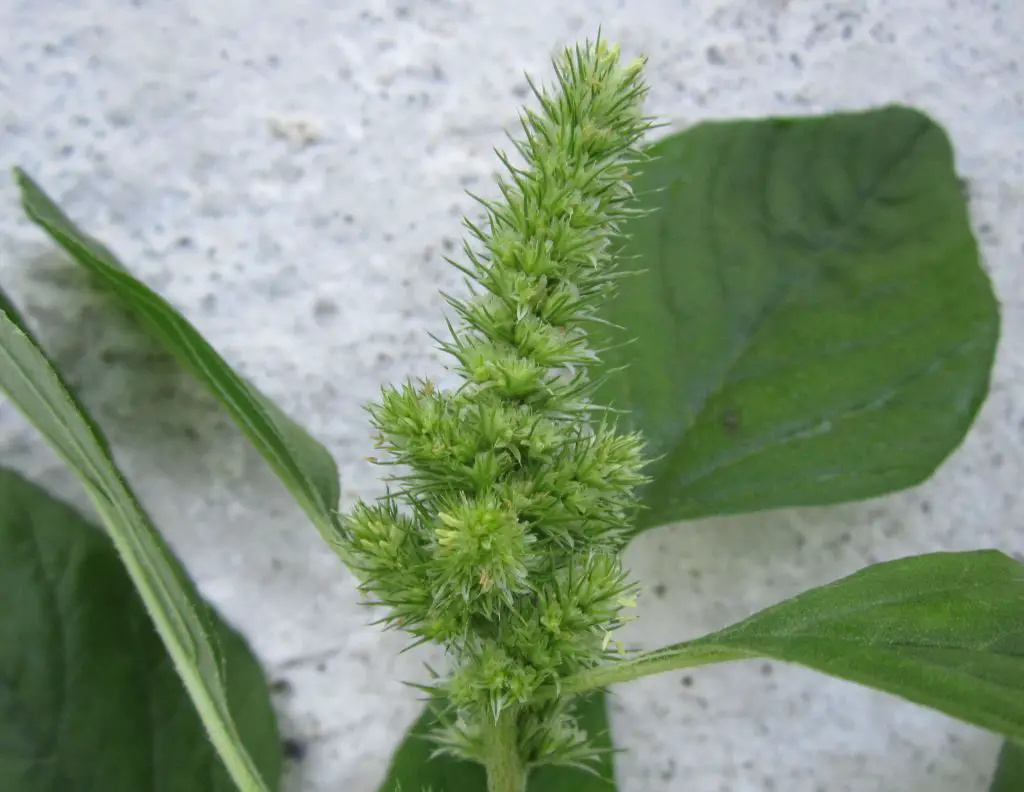
Amaranth with Seed Head – this is still too green to harvest.
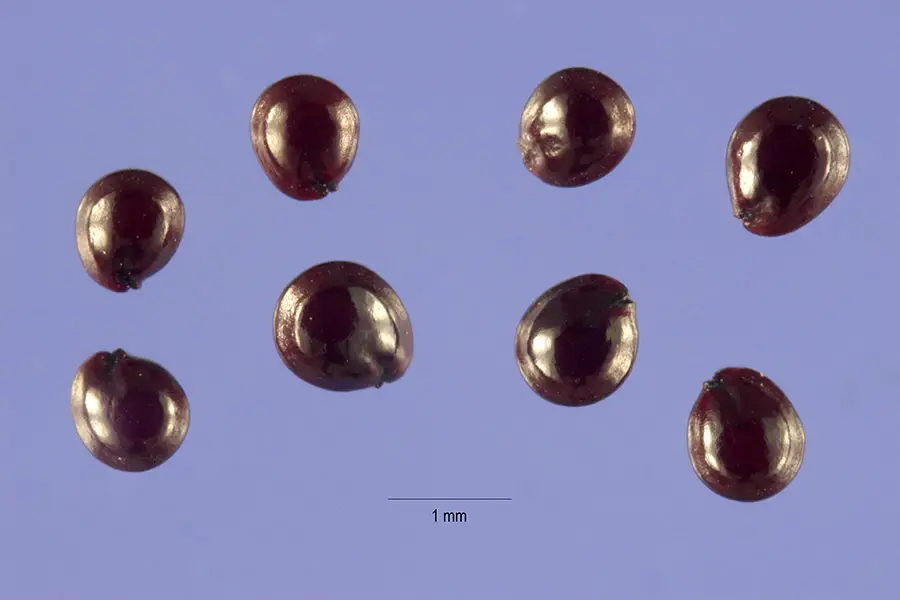
Amaranth seeds (grain). (Steve Hurst, hosted by the USDA-NRCS PLANTS Database)
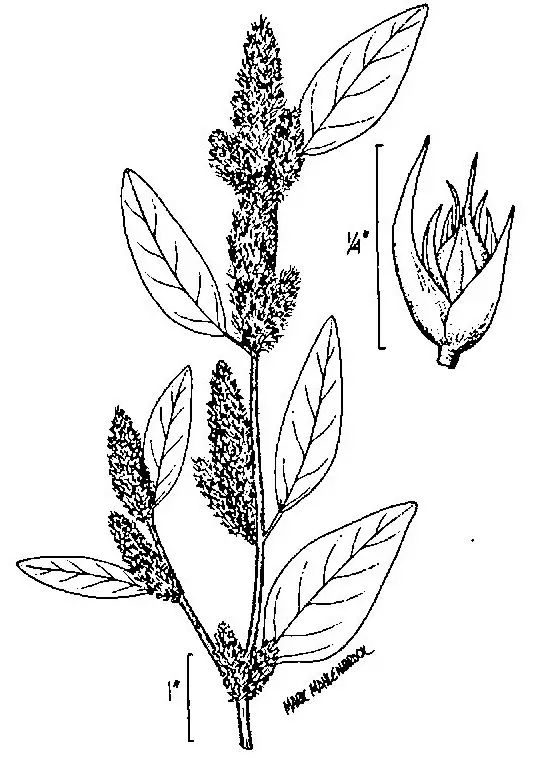
Amaranth drawing. (USDA-NRCS PLANTS Database / USDA NRCS. Wetland flora: Field office illustrated guide to plant species. USDA Natural Resources Conservation Service)
Search Wild Foods Home Garden & Nature's Restaurant Websites:
Share:


Why does this site have ads?
Originally the content in this site was a book that was sold through Amazon worldwide. However, I wanted the information to available to everyone free of charge, so I made this website. The ads on the site help cover the cost of maintaining the site and keeping it available.
Google + profile
![]()
Wild Foods Home Garden Logo Copyright © 2017 David G. Mills.
Text Copyright © 2014, 2015, 2016, 2017, 2018 David G. Mills.
All Photographs Copyright © 2014, 2015, 2016, 2017, 2018 David G. Mills except where noted.*
All Drawings Copyright © 2014, 2015, 2016, 2017, 2018 David G. Mills except where noted.
All Rights Reserved.
This may not be reproduced in any form, in whole or in part, without written permission from the author.